
Testing note I originally wanted to test Seedance 2.5, but it was not fully available in my flow. So I used Seedance 2.0 to understand the actual prompt-to-video workflow. This article is based on my interface experience, uploaded references, prompt setup, login process, generation attempt, and pricing/credit screen observations. Pricing and credit details were visible during my check and may change later. |
Most people imagine AI video generation as a one-line job: type a sentence, click a button, get a clip. After spending time inside the Seedance 2.0 interface, here is the honest version: a single prompt only becomes a complete video after the tool checks and combines several things around it.
Before anything moves on screen, the model needs to understand the subject, the motion, and the visual direction, which can come from uploaded reference images. It also needs a duration, an aspect ratio, a resolution, and enough credits in your account. If any piece is missing, the result suffers or the generation never starts.
The way I now think about it: the prompt is not the whole video. It is the starting brief, and the generator uses everything around it to build the final moving result. This article walks through that journey exactly as I experienced it, screenshots and small frustrations included.
I first searched for Seedance 2.5 in my browser because it looked like the newer version with more advanced video generation possibilities. The suggestions showed a mix of results: a Seedance 2.5 page, the Seedance 2.0 site, and a Topview page promoting a Seedance 2.5 AI video generator. On paper, the newer version was clearly the more exciting option.
However, Seedance 2.5 was not fully usable in my testing flow, so let me be transparent upfront: I did not test Seedance 2.5 output, and nothing here is a Seedance 2.5 quality review. The hands-on process was done through Seedance 2.0, which still gave me a practical way to understand the prompt to video journey, because the basics remain similar across versions: choose the model, log in, add references, write the prompt, select the output settings, generate, and check whether credits are required..
One small observation: I liked that the Seedance ecosystem connects multiple tools and versions, but it is slightly confusing when you search for Seedance 2.5 and the working interface still shows Seedance 2.0. A beginner could easily mix up which version they are using.
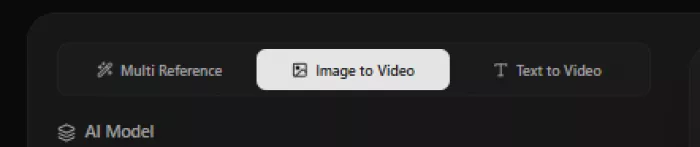
The Seedance 2.0 page opens with a big heading and a line about multi-modal AI video creation, meaning you can combine images, videos, audio, and text. Below that sits the workspace: a creation panel on the left with three tabs (Multi Reference, Image to Video, and Text to Video), an AI Model section showing Seedance 2.0 with an audio badge, an upload area, and a preview video on the right.
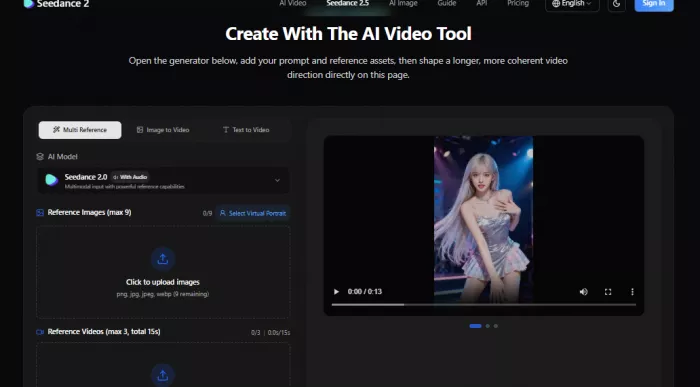
Seedance 2.0 showed the actual workspace for turning prompts and references into video.
This is where the prompt starts becoming more than text. Before writing anything, you decide your entry point: text only, a single image, or multiple references. A creator can start with pure imagination, while a business owner can use product or shop photos to pull the output closer to their real brand.
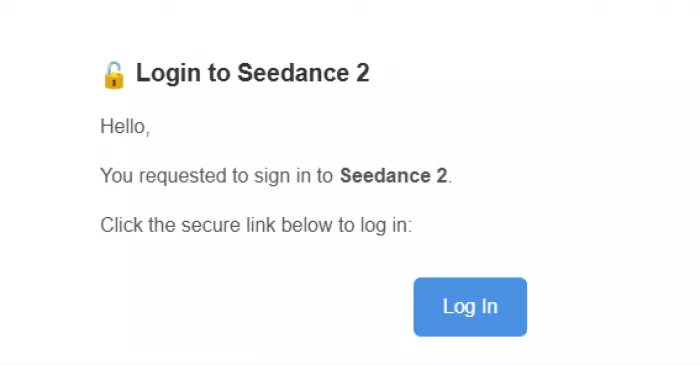
At this point, I expected the tool to continue smoothly into generation. Instead, it asked me to sign in, offering Continue with Google or Continue with Email. I chose the email route first.
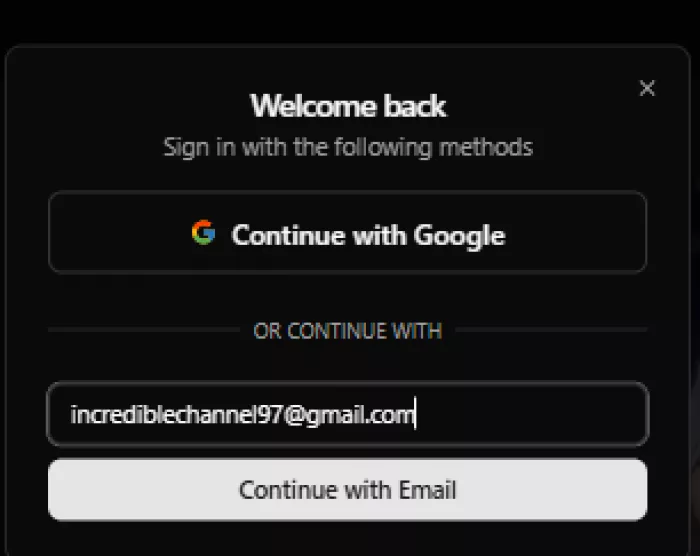
A green confirmation showed that a magic link had been sent, meaning a one-time login link with no password to remember. I opened the email from Seedance 2 and clicked its Log In button; the message noted the link expires in one hour.
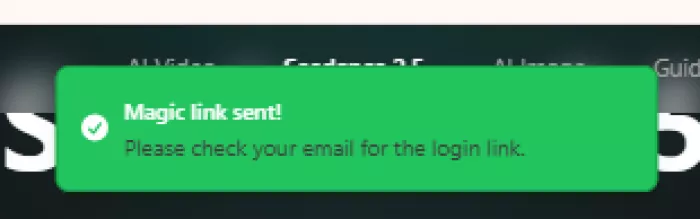
The tool sent a magic login link to my email.
The login link arrived in email and had to be opened separately.
That brought me back to Seedance with one more step: a Confirm Login screen with a shield icon. Only after pressing that button was I actually inside.

After clicking the link, I still had to confirm login on the Seedance page.
My honest take: magic link login is pleasantly simple, but switching between the website and your inbox mid-test breaks the flow. One practical note: never publish personal email addresses openly. Blur them before adding screenshots to any article, as I have done here.
Here is the part I genuinely did not enjoy. After completing the email login, I pressed the browser back button out of habit. The flow did not continue from where I was; it pushed me back into the login journey a second time.
Worse, the retry failed. The screen showed a red error icon saying the login failed, and right below it, the tool recommended using Google Sign-In for a smoother experience.
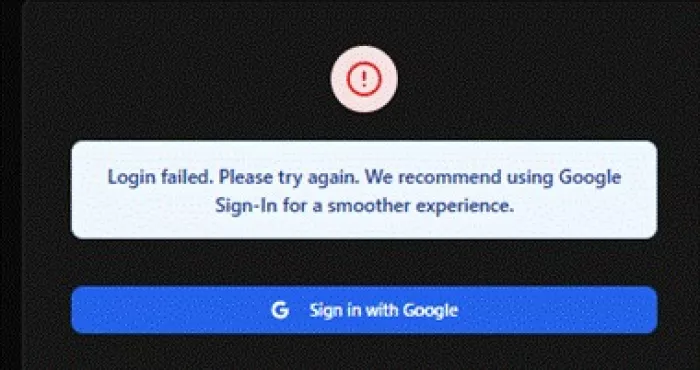
After going back, the login flow restarted and later showed a failed login message.
To be fair, this is a user-experience complaint, not a video quality complaint, and the tool itself pointed at the fix: Google login is probably the smoother option. But a session should ideally survive a back button press. This made me realize that AI video generation is not only about writing a prompt; sometimes the biggest friction sits before the prompt box.
Once properly logged in, I looked at the three creation modes. Text to Video means you only describe the scene and the AI imagines everything. Image to Video animates one uploaded image. Multi Reference lets several images, videos, or audio files guide the video, with up to nine slots.
The interface lets users choose how they want to start the video.
I moved toward the image-based workflow because I wanted real visual references. This matters more than beginners realize: a single prompt becomes much stronger when supported by images. Without them, the text to video AI invents every detail from scratch. With them, it has a visual anchor.
| Mode | Best For | My Simple Take |
| Text to Video | Starting from only an idea | Good for imagination-based clips |
| Image to Video | Animating one image | Good for bringing a photo to life |
| Multi Reference | Using several visual inputs | Better for brand, product, or location control |
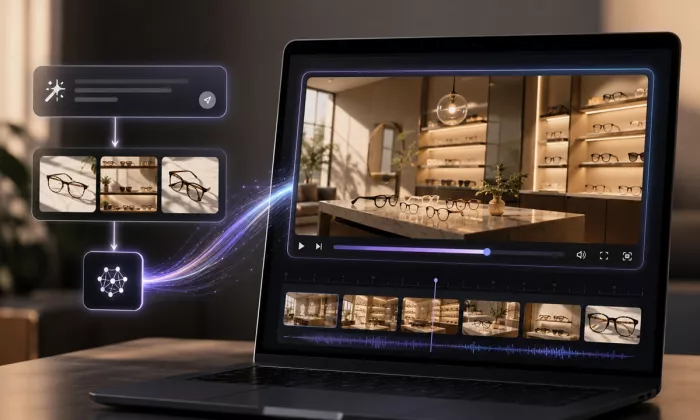
For my test, I uploaded four real photos of an optical shop: the signboard and three shots of the eyewear display walls. The interface showed 4/9 images uploaded, an open Add Image slot, and an Add end frame option that lets you define how the clip should finish.
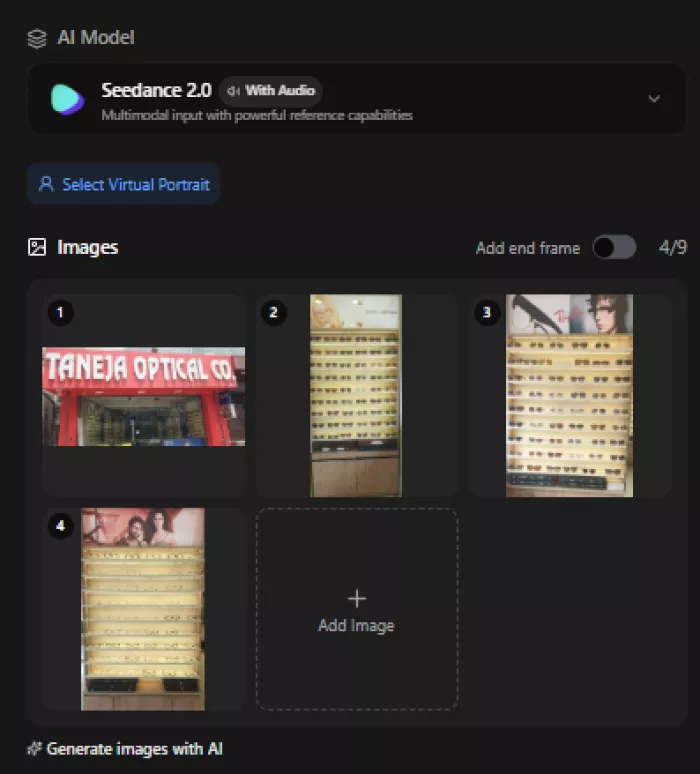
I uploaded real optical shop images to guide the AI visually.
These references give the AI far more context than words alone. Instead of asking it to imagine some random optical store, I handed it real visuals, so the model reads the subject, display style, colors, product type, and scene direction directly from the photos.
I liked this part a lot, because it made the tool feel practical for local businesses. A shop, salon, clinic, or restaurant could upload real images and get a moving, commercial-style video without hiring a camera crew.
Now for the prompt itself, the heart of this article. A basic prompt might say make this image into a video. Mine asked for a realistic cinematic animation of the provided image, brought to life through smooth, subtle movements: gentle breathing, shifting light, soft background motion, and a slow camera pan, while keeping the exact style, colors, and composition of the original photo.
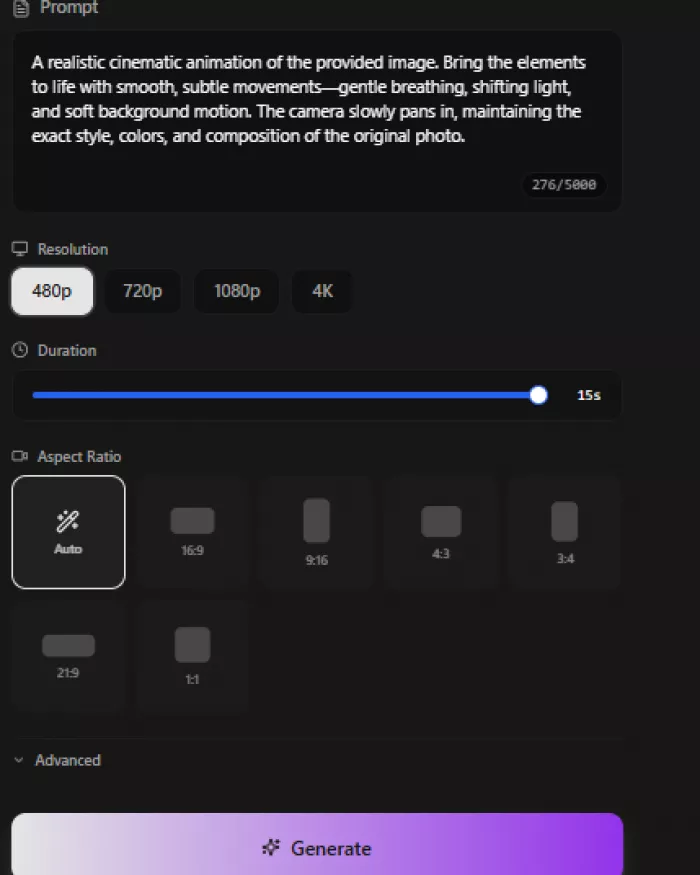
The prompt asked the tool to animate the uploaded image with subtle cinematic movement.
Notice the difference: the prompt is not describing an object, it is directing a scene. It tells the model which elements should move, in what mood, and what must stay untouched. This is where a single prompt starts becoming a video plan. The AI is not only told what the image is; it is told how the image should move.
| Weak Prompt | Better Prompt |
| Animate this image | Add slow camera movement, soft lighting change, subtle background motion, and keep the original colors |
| Make a shop video | Turn the shop images into a clean commercial-style clip with smooth movement and realistic details |
| Create an optical ad | Show the eyewear display with gentle motion, bright professional lighting, and a trustworthy local business feel |
The interface also showed me a very different prompt style in another session: a scripted commercial for a family eye care clinic, set to 9:16 vertical format. The same tool produces subtle photo animation or full scripted ad concepts, depending on how you write the AI video prompt.
The prompt tells the model what to create. The settings below it tell the tool how the video should be packaged. I selected 480p resolution, a 15-second duration, and the Auto aspect ratio option.
The choices were 480p, 720p, 1080p, and 4K; 480p is lighter and uses fewer credits, while higher options cost more but look sharper. Fifteen seconds gives the AI more time to show movement. Auto aspect ratio follows the uploaded reference, while 16:9, 9:16, 4:3, 3:4, 21:9, and 1:1 exist for specific platforms.
| Aspect Ratio | Where It Usually Fits |
| 16:9 | YouTube, website banners, landscape videos |
| 9:16 | Instagram Reels, TikTok, YouTube Shorts |
| 1:1 | Social posts and product previews |
| 4:3 / 3:4 | More traditional or portrait-style framing |
| 21:9 | Cinematic wide shots |
| Auto | When you want the tool to follow the uploaded image naturally |
I deliberately picked a lower-resolution setup first, to understand the workflow before spending more credits on a high-quality output. For beginners, this is the single most useful habit: test cheap, then upgrade.
When I clicked Generate, the tool stopped being a form and became a processing system. It had my images, my animation prompt, my resolution, duration, and aspect ratio. The button switched to a Generating state, which showed the prompt to video process had started.
From a user-side view, in simple terms, roughly this happens behind that button: the system reads the prompt, studies the uploaded images, identifies the key visual elements, decides which parts should move, keeps the original composition, builds a sequence of frames, stitches them into a short video, and prepares a preview. This is the visible flow, not the internal engineering, so treat it as a practical mental model.
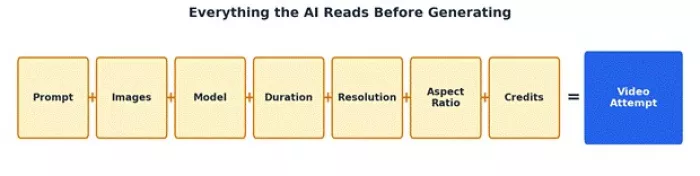
Every one of these inputs feeds into a single generation attempt.
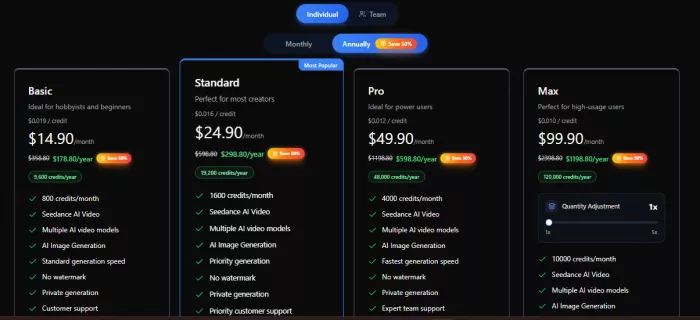
This is where the workflow becomes financial. Generation runs on credits, and during my check the pricing pages showed four plans (Basic, Standard, Pro, and Max) with monthly and annual billing, a 50% annual saving badge, and features like no watermark, private generation, and a commercial use license on higher tiers.
The subscription plans showed different monthly credits and usage levels.
Monthly credit allocations per plan, as shown during my check.
This is why a casual user and a heavy creator will not choose the same plan; the right one depends on how often you generate and how much quality you need. For people who dislike subscriptions, one-time credit packs were also on offer (Starter through Ultra), with credits that never expire.
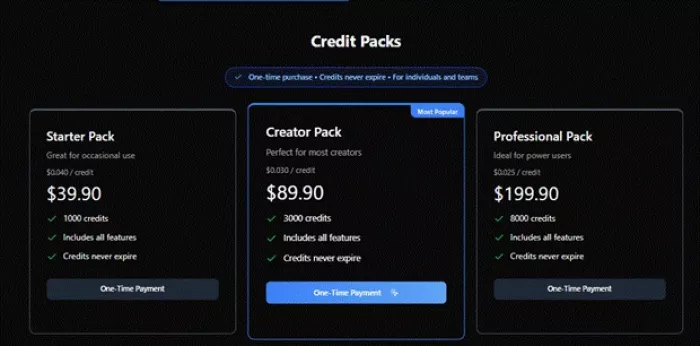
One-time credit packs were also available for users who do not want a monthly plan.
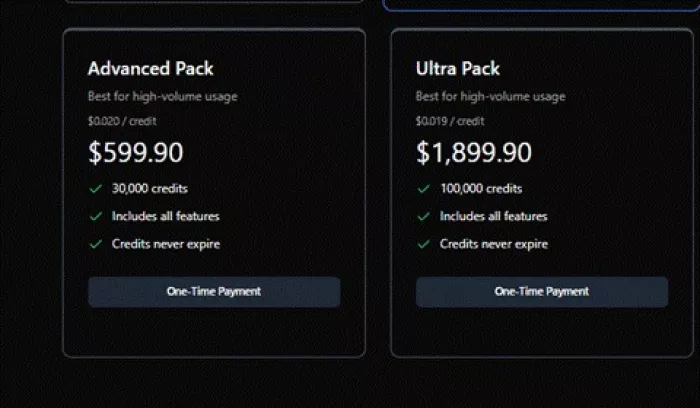
Larger Advanced and Ultra packs targeted high-volume users.
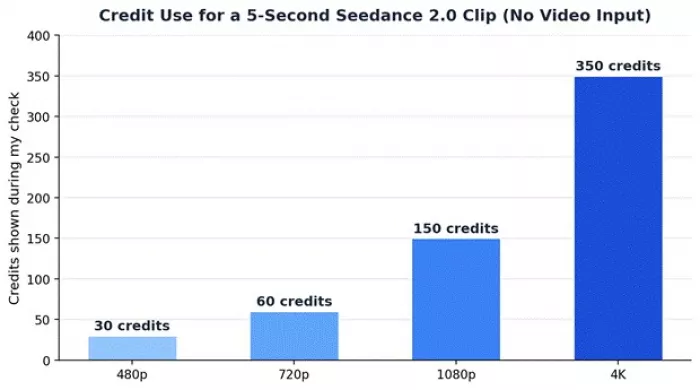
The most educational screen was the Seedance 2.0 Series credit table. Credit usage changes with the model version, the resolution, whether video input is used, and the duration, since cost is counted in credits per second. Fast and Mini appeared as cheaper variants, with Mini at half the standard cost.
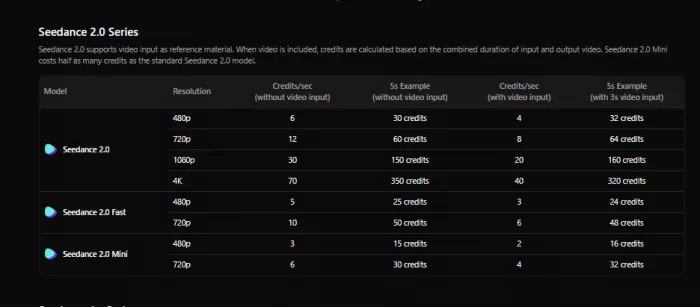
The credits per second table showed how resolution and model choice affect generation cost.
In simple words: the longer and higher-quality the video, the more credits it eats, and if video input is involved, the input duration counts too. As the chart below shows, increasing resolution quickly increases the credit requirement, so testing at a lower resolution first is the smarter move.
Moving from 480p to 4K raised the 5-second cost from 30 to 350 credits.
| Resolution | Credits/Sec Without Video Input | 5s Example |
| 480p | 6 | 30 credits |
| 720p | 12 | 60 credits |
| 1080p | 30 | 150 credits |
| 4K | 70 | 350 credits |
Note: these figures reflect the table I saw during my check. Credit rules, prices, and plans can change, so confirm the latest numbers before generating in volume.
Pulling everything together, here is how a single prompt becomes a complete video, based on my walkthrough:
1. The user starts with an idea.
2. The idea becomes a written prompt.
3. The prompt is supported with reference images.
4. The user chooses the model and creation mode.
5. The user selects a resolution.
6. The user selects a duration.
7. The user selects an aspect ratio.
8. The system checks credit availability.
9. The AI processes the prompt and references.
10. The result becomes a generated video preview.
11. The user reviews, edits, regenerates, downloads, or tries again.
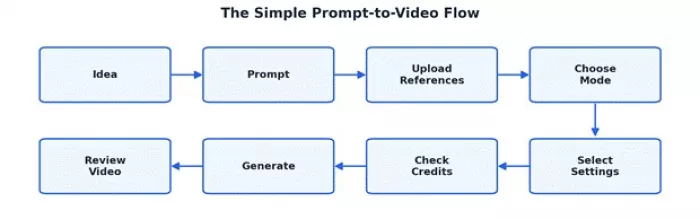
Idea, Prompt, References, Settings, Credits, Generate, Preview, Refine.
This simple flow is the easiest way to understand AI video generation. The prompt starts the process, but the complete video depends on everything added after it.
| Prompt Element | The Job It Does |
| Subject | Tells the AI what the video is about |
| Motion | Tells what should move |
| Camera direction | Helps create a cinematic feeling |
| Lighting | Controls mood and realism |
| Style | Keeps the output visually consistent |
| Reference instruction | Tells the model to follow uploaded images |
| Output purpose | Helps shape the video for ads, social, or branding |
| Method | Result Control |
| Text prompt only | More creative but less predictable |
| Prompt with images | More controlled and closer to the real subject |
• The interface supports different creation modes, giving text-only creators and image-first businesses a clear path.
• Image uploads make the result more controlled, the real difference between a random clip and a usable one.
• The prompt box supports detailed direction, with a generous 5,000 character limit.
• Duration and resolution controls are easy to find and understand.
• The Generating state clearly shows the process has started.
• Credit and plan details are visible before serious usage.
• It feels genuinely useful for local business videos built from real shop photos.
• Seedance 2.5 was the version I wanted, but Seedance 2.0 was the only practical test route.
• The login flow interrupts the creative process, especially the email round trip.
• Pressing the back button restarted the login journey, which was frustrating.
• Email login failed on the retry; Google sign-in should probably be the headline option.
• Beginners may not understand credits per second immediately.
• Pricing and credits need careful checking before generating many videos.
• Without understanding resolution and duration, credits can burn faster than expected.
| Stage | The Thing That Happened | My Take |
| Searched Seedance 2.5 | Looked for the newer model first | I was interested, but it was not fully available in my flow |
| Opened Seedance 2.0 | Saw the working generator | This became the real testing area |
| Tried login | Used the email magic link | Simple, but it interrupted the flow |
| Pressed back | Login restarted | This was frustrating |
| Login failed later | Tool recommended Google Sign-In | Google login may be smoother |
| Uploaded images | Added optical shop references | Helped give visual direction |
| Wrote prompt | Asked for cinematic animation | The prompt became a motion instruction |
| Chose settings | 480p, 15s, Auto aspect ratio | Good for a first test |
| Clicked Generate | Tool started generating | The prompt-to-video process began |
| Checked pricing | Saw plans, packs, and credits/sec | Credits are part of the workflow |
| Pack | Credits Shown | Use Case |
| Starter Pack | 1,000 | Occasional use |
| Creator Pack | 3,000 | Small creator testing |
| Professional Pack | 8,000 | Business or agency experiments |
| Advanced Pack | 30,000 | High-volume usage |
| Ultra Pack | 100,000 | Very heavy production use |
| Plan | Monthly Credits Shown | Best For |
| Basic | 800 | Light testing |
| Standard | 1,600 | Regular creators |
| Pro | 4,000 | Frequent video generation |
| Max | 10,000 | Heavy usage |
A single prompt can become a complete video, but only after the tool combines it with references, model settings, duration, resolution, aspect ratio, login access, and credits. My Seedance 2.0 test showed that AI video generation is not a magic one-click process; it is more like preparing a mini creative brief for the model.
My walkthrough covered the interface, setup, login, and pricing screens rather than a quality benchmark of finished renders, so my rating scores the workflow experience, not the final video quality. I am not scoring output I did not fully evaluate, and not scoring Seedance 2.5 at all.
| Area | My Rating | The Reason |
| Creation interface and modes | 4.5 / 5 | Clear tabs, generous prompt box, sensible layout |
| Reference image support | 4.5 / 5 | Up to nine references plus an end-frame option |
| Settings clarity (resolution, duration, ratio) | 4 / 5 | Easy to use, though credit impact could be flagged inline |
| Login experience | 2.5 / 5 | Magic link works, but the back-button restart and failed retry hurt |
| Pricing and credit transparency | 4 / 5 | Plans, packs, and a per-second table were all visible |
| Beginner friendliness | 3.5 / 5 | The flow is learnable, but credits-per-second needs explaining |
My overall workflow rating: 4 out of 5. The creation side is well designed and the credit system is transparent once you find the table. Login friction is the main thing holding the experience back, and it is fixable.
Seedance 2.5 was the version I wanted to try, but Seedance 2.0 still showed me the real lesson: the prompt starts the video, but the workflow shapes it.
Before you generate your first AI video: do not just write a random prompt. Prepare your images, choose the right format, check the credit cost, and save your prompt. That gives the AI a much better chance of turning your idea into a useful video.
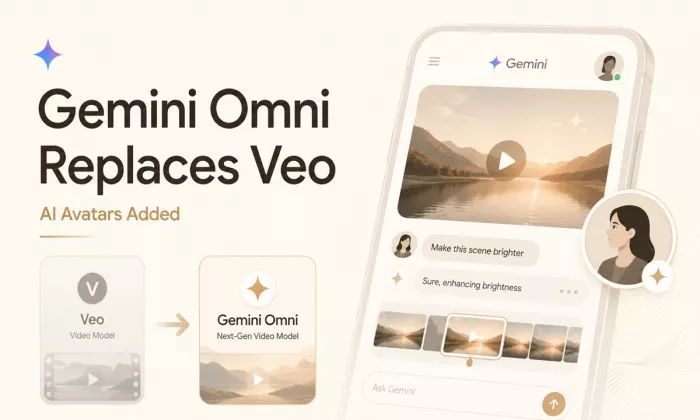
Google is officially retiring Veo as the default video model inside th...
AI image and video tools have made visual creation much faster.A creat...
In today’s fast-moving digital world, visuals do most of the talking....

SpaceX is usually associated with rockets, satellites, and interplanet...
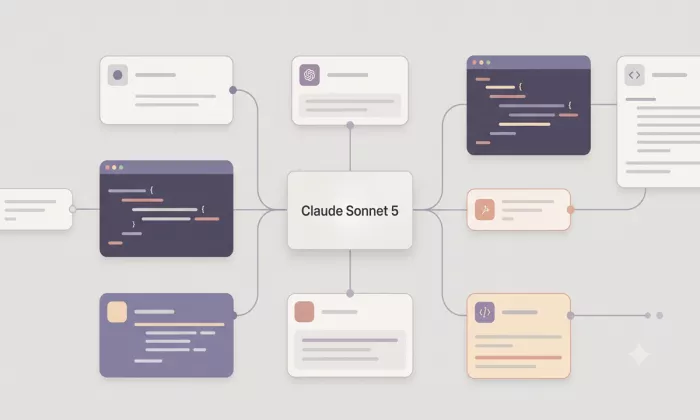
Anthropic has introduced Claude Sonnet 5, its new mid-tier AI model de...

Nastia AI and Candy AI are two of the more talked-about AI companion p...
Discussion