

I tested Pica AI because I had three ordinary photo problems that most people run into. One image looked dull and slightly blurry. One selfie needed to look more professional for profile use. And one face swap idea seemed fun, but I did not want it to come out obviously fake. Pica AI claims to handle all three jobs from one place through its Enhance, Headshot+, and Face Swap tools, so I used it the way a normal user would, not the way a designer with Photoshop level expectations would.
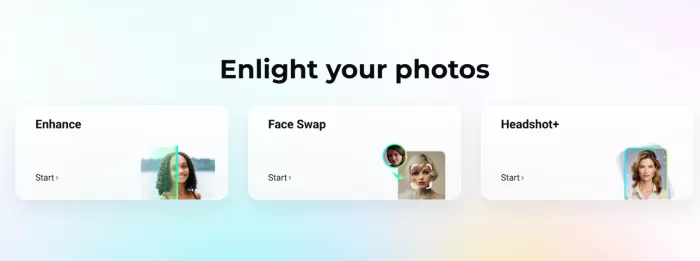
The official site is clear about what it sells. The homepage leads with one click image enhancement, a free online face swap, and AI headshot style portraits, and it currently shows a banner noting that Photo Enhancer was upgraded to Artguru on October 31, 2025. That focus is exactly why I wanted to test it, not as a do everything editor, but as a quick fix for three very common needs.
This review keeps to three questions:
1. Can Pica AI make a weak photo look cleaner?
2. Can it create a headshot that still looks like me?
3. Can its face swap produce a usable image without looking awkward?
Everything below answers those questions through the actual tool experience, not through marketing copy.
I did not judge Pica AI like a professional retouching suite. I judged it as a quick AI editor for people who want better photos without learning layers, masks, or manual retouching. That framing matters, because Pica AI is at its strongest when expectations stay practical: cleaner images, better profile photos, and quick face swaps.
| Test | Input used | Tool tested | What I checked |
| Photo cleanup | A slightly blurry, low detail portrait | Pica AI Enhance | Sharpness, skin texture, noise, background clarity |
| Profile image | A casual selfie | Pica AI Headshot+ | Face similarity, clothes, background, professional feel |
| Creative edit | A clear, front facing face photo | Pica AI Face Swap | Face alignment, skin tone, lighting, edges, expression |
How I approached it: this review is based on working through Pica AI's three core tools with the three sample images above, alongside a close read of the current product pages and privacy policy. Results depend heavily on the input image, so treat the findings as guidance rather than guarantees.

My testing method: three photos, three tools, and what I checked in each.
The first thing I noticed is that Pica AI does not behave like Canva or Photoshop. It feels more like a choose the tool, upload the photo, wait for the AI experience. That is good if you want speed, and less ideal if you want to adjust every small detail yourself.
Pica AI positions Enhance, Face Swap, and Headshot+ as visible core tools on its homepage, so finding the right starting point takes seconds. The upload flow is simple, outputs arrive without much waiting, and there is almost no settings panel to get lost in. The flip side is that there are very few manual controls, so when a result is not quite right, the main option is to generate again rather than fine tune.
| First impression area | My finding |
| Ease of starting | Simple enough for beginners |
| Tool focus | Enhance, Face Swap, and Headshot+ are easy to find |
| Manual control | Limited compared with professional editors |
| Best use style | Upload, generate, compare, export |
| Biggest early question | Whether credits and pricing feel fair after several tests |
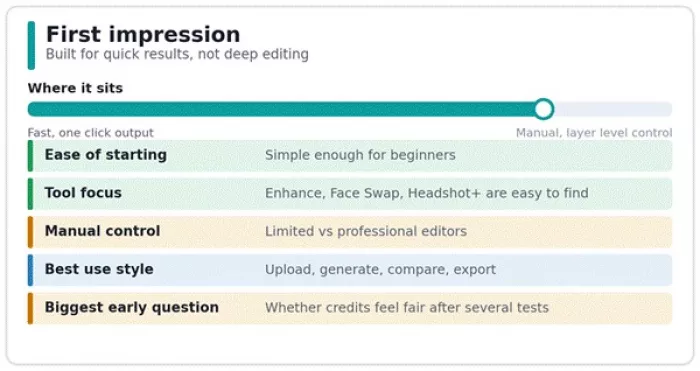
First impression at a glance: fast and simple, with little manual control.
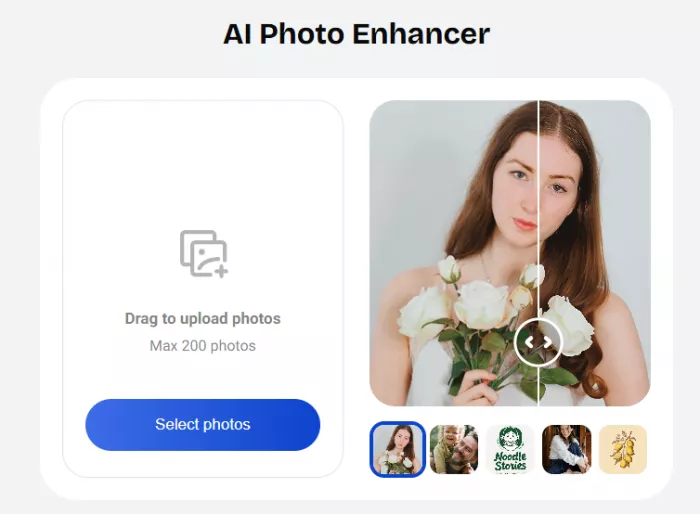
I started with the photo enhancer because it is the most practical Pica AI feature for everyday users. The product describes it as a one click way to sharpen photos, remove focus blur, and lift low resolution images toward HD, and it can enlarge an image up to about four times its original size. The site also currently flags that this tool was upgraded to Artguru on October 31, 2025, so some enhancement traffic now runs on that newer engine while the rest of Pica AI keeps its own branding.
I fed it a photo that was not terrible but had the usual problems: soft detail, weak sharpness, and a little flatness in the face. The cleaner look showed up quickly. The face gained definition, the image felt less dull, and the result looked more usable for a profile or a casual post.
The biggest gain was overall clarity, and it arrived without any manual editing. Even so, I would zoom in before using the output anywhere that matters. AI enhancers can over smooth skin, sharpen hair in odd ways, or make fine textures look slightly artificial, and Pica AI is no exception.
| Enhancer check | My finding |
| Sharpness | Improved most on slightly soft photos |
| Skin texture | Better from a distance, but check for smoothing |
| Hair detail | Can look sharper, sometimes slightly artificial |
| Background | Cleaner, but not always naturally restored |
| Low light photos | Mixed results depending on original quality |
| Very blurry photos | Do not expect miracles |
| Best use | Profile photos, old casual photos, social uploads |
| Not ideal for | Professional retouching or ecommerce product cleanup |
My practical verdict: Pica AI Enhance is useful when the original image is almost good and just needs polish. It is far less impressive when the photo is extremely blurry, badly compressed, or missing too much detail. Put simply, it improves weak photos better than it rescues ruined ones.
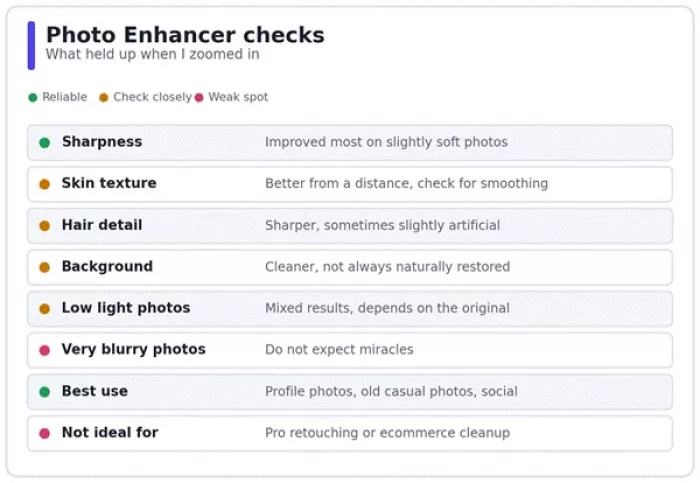
Photo Enhancer: what held up, what to inspect, and where it stays weak.
Here is the order I would actually follow. First, I would start with the clearest version of the photo rather than a screenshot pulled from WhatsApp or Instagram, because better input always gives better output. Then I would upload it to Pica AI Enhance and generate a single result. After that, I would compare the original and the enhanced version side by side, paying attention to the eyes, the hairline, the teeth, the skin texture, and the edges of the background. If the enhanced image looks too smooth or too sharp, I would keep it for casual use only and avoid it for anything professional.
| Step | What I do | Why it matters |
| 1 | Upload the clearest original photo | Better input gives better output |
| 2 | Run Enhance once | First result shows whether the photo is recoverable |
| 3 | Zoom into face and hair | AI artifacts often appear there |
| 4 | Compare original vs output | Avoid over edited results |
| 5 | Export only if it looks natural | Natural output matters more than extreme sharpness |
My rule: If the improved image looks better within two seconds and still looks natural after I zoom in, it is usable.
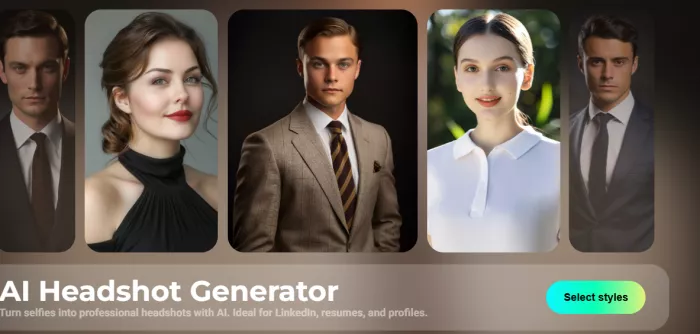
The headshot tool is the one I would test most carefully, because a headshot is supposed to represent you, not just produce a polished version of your face. Pica AI markets Headshot+ as a way to turn selfies into professional portraits for LinkedIn, resumes, and profiles. I approached it with a casual mindset, the kind of selfie a normal user uploads when there is no studio photo to hand. The goal was not to look like a model. It was to see whether the result could pass as professional while still looking believable.
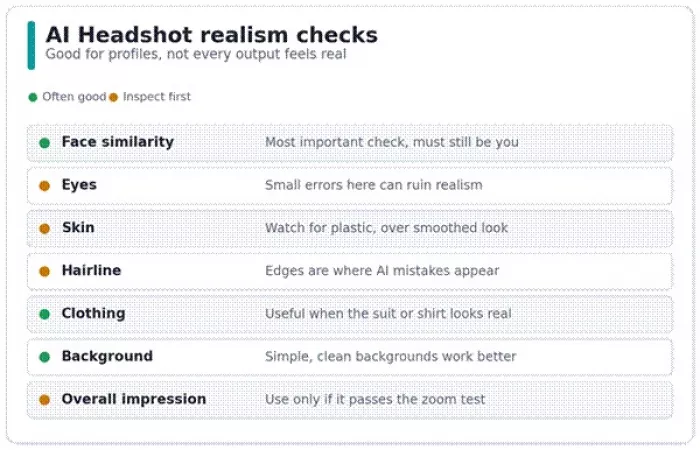
Identity is where these tools succeed or fail. The strongest outputs kept the face recognizably the same, with natural eyes, clean teeth, and skin that still looked like skin. The weaker ones drifted into a glossy, over polished look, smoothed the hairline a little too far, or subtly shifted the face enough that it no longer felt like the same person. Clothing and backgrounds were a smaller concern, and simple, uncluttered backgrounds tended to look the most convincing.
| Headshot area | What I checked | My finding style |
| Face similarity | Does it still look like the same person? | Most important check |
| Eyes | Are both eyes natural and aligned? | Small errors can ruin realism |
| Skin | Does it look human or plastic? | Over smoothing is common |
| Hairline | Are the edges clean? | Often where AI mistakes appear |
| Clothing | Does it look professional? | Useful if it looks realistic |
| Background | Clean but not fake? | Simple backgrounds work better |
| Overall impression | Would I use it on LinkedIn? | Only if it passes the zoom test |
My practical verdict: Pica AI Headshot+ is useful if you need a quick profile image and do not want to book a photographer. I would not upload the first output blindly, though. I would generate a few options, zoom in, and pick the one that looks most like the real person rather than the one that looks the most polished.
AI Headshot realism checklist: what to verify before you use one.
For a LinkedIn style test, I would upload a clear selfie with normal lighting and no heavy filters, and I would avoid sunglasses, side angles, group photos, and old images, because these tools need a clean face reference. Once Pica AI generates the headshot, I would check whether the face still feels like me, whether the eyes look natural, whether the clothing looks believable, and whether the background feels professional without looking fake.
| Step | My check | Pass or fail rule |
| Upload selfie | Clear, front facing, recent | Pass if the face is unobstructed |
| Generate headshot | Choose a professional style | Pass if the output keeps identity |
| Zoom into face | Check eyes, teeth, skin, hair | Fail if the face looks distorted |
| Check clothing | Suit or shirt should look natural | Fail if collar or buttons look strange |
| Check use case | LinkedIn, resume, portfolio | Pass only if it looks believable |
Important: Do not use AI headshots for government ID, legal documents, school records, employee verification, or anything that requires an actual verified photograph.
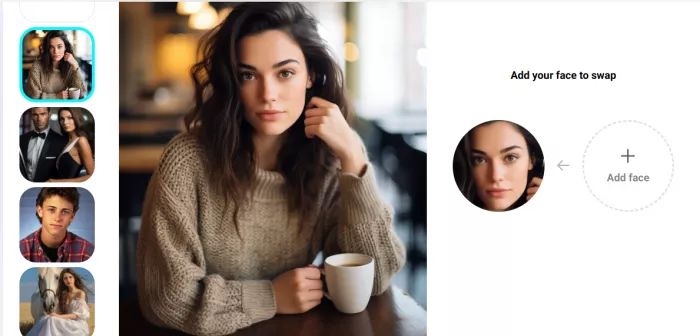
Face Swap is the most fun Pica AI feature and the one that needs the most caution. Pica AI describes its online face swap as a way to change faces in photos, cartoons, artworks, famous paintings, memes, and social style images, and the tool also works on short videos and on shots with more than one face. I treated it as a creative tool, never as a way to impersonate anyone. The best results came when the source face and the target image shared a similar angle and similar lighting. Once the angle drifted too far apart, the output started to look edited.
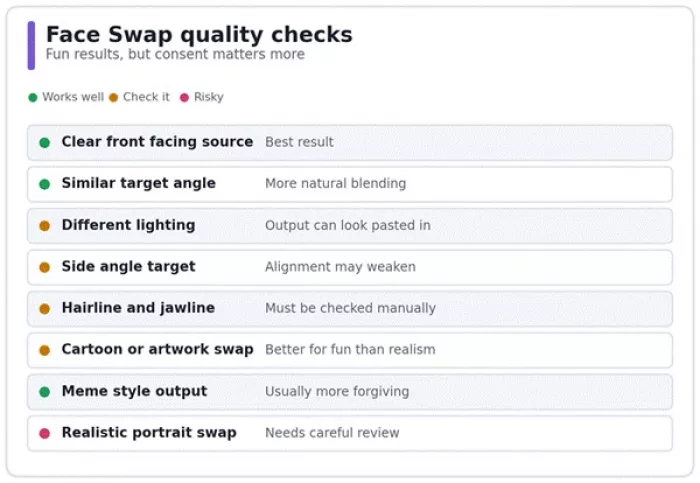
Most of the giveaways live at the edges. The hairline, the jawline, and the skin tone transition are where a swap either holds together or falls apart, so those are the first places I would look. Cartoon and artwork swaps were forgiving and fun, meme style images were the most forgiving of all, and a realistic portrait swap was the hardest to pull off cleanly.
| Face swap test area | My finding |
| Clear front facing source photo | Best result |
| Similar target angle | More natural blending |
| Different lighting | Output can look pasted in |
| Side angle target | Alignment may weaken |
| Hairline and jawline | Must be checked manually |
| Cartoon or artwork swap | Works better for fun than realism |
| Meme style output | Usually more forgiving |
| Realistic portrait swap | Needs careful review |
My practical verdict: Pica AI Face Swap is at its strongest for casual creative edits, memes, profile experiments, and entertainment style images. It is weaker when you expect a flawless, cinematic, deepfake quality result. The more realistic the use case, the more carefully the output needs to be checked.
Face Swap quality checklist: where it works and where it slips.
To get a better swap, I would start with a clear source photo where the face is fully visible, front facing, and not hidden behind sunglasses or heavy shadow. Then I would choose a target image with a similar face angle. After generating the swap, I would check the forehead, the jawline, the neck, the ears, and the skin tone first, because those areas reveal the edit fastest. If the lighting feels mismatched, I would not use the result for anything serious.
| Step | What I would do | Why it helps |
| 1 | Use a clear source face | Helps the AI understand face structure |
| 2 | Match the face angle | Reduces awkward alignment |
| 3 | Match lighting if possible | Makes skin blending more natural |
| 4 | Check jawline and hairline | These reveal fake looking swaps |
| 5 | Use only with consent | Prevents misuse and ethical issues |
Safety and consent: The face swap feature should never be used to create non consensual edits, fake evidence, impersonation, harassment, misleading political content, adult style manipulation, or anything that could damage someone's reputation.
Pica AI runs on credits, and it does have a free tier, so you can try the tools before paying. Beyond that, I would treat every number carefully. AI tools change their credits, paid plans, free limits, and export rules often, and different listings already disagree. The developer's own app listings and various third party pages have shown free daily credits alongside weekly, monthly, and annual options. Because of that, the only pricing that should guide a buying decision is what appears on the official Pica AI pricing page on the day you check.

Because all three tools depend on uploading a face, privacy is a fair thing to ask about. Pica AI is operated by Wegital HK Limited, and its privacy policy is reasonably specific. The policy states that Pica AI does not use its technology to identify or authenticate people in the photos or videos you upload, and that it does not sell your photos or videos. It also says your uploaded photos are not used to train its AI, although content you generate may be.
The policy defines Face Data as information that estimates the location and shape of facial features, notes that this may count as biometric data depending on where you live, and states that Face Data is used only to enhance your photos and create the AI photos and videos you request, unless you give specific consent for other processing. Uploads are encrypted and stored in the cloud, data is transferred to servers in the United States, and it may also be accessed from the company's offices in mainland China and Hong Kong.
None of that removes the basic rule for any AI photo tool: once a face leaves your device, it is out of your hands. I would only upload images I own or have clear permission to use, I would keep sensitive or private photos off the platform entirely, and I would never run a face swap on someone who has not agreed to it.
After working through the three tools, a clear pattern showed up.
| Tool | Best result came from | Main weakness | My practical verdict |
| Enhance | Slightly blurry or dull photos | Cannot fully rescue very bad images | Good for quick cleanup |
| Headshot+ | Clear selfies with natural lighting | Some outputs may look too AI polished | Useful for profiles if carefully selected |
| Face Swap | Matching angles and clear faces | Lighting and edge mismatch | Fun and usable, but consent is essential |
I would not call Pica AI a professional editor. I would call it a quick AI photo assistant. It shines when the job is simple: make this photo cleaner, build a better profile image, or try a creative face swap. It gets weaker the moment you need exact control, true retouching, or guaranteed realism.
| User type | Should they try Pica AI? | Reason |
| Casual user | Yes | Easy photo cleanup and fun edits |
| Social media creator | Yes | Face swap and quick visuals are useful |
| LinkedIn user | Maybe | Headshots can work if they look realistic |
| Student | Yes | Simple edits without complex software |
| Small business owner | Maybe | Good for profile photos, not product shoots |
| Photographer | No as a main tool | Too little manual control |
| Designer | No as a main tool | Not enough precision |
| Ecommerce seller | Not ideal | Needs better product specific editing |
| Heavy face swap user | Maybe | Compare with Remaker AI or DeepSwap |
If I only needed quick social visuals, Pica AI would make sense. If I were preparing brand visuals, client photos, or ecommerce images, I would use it only as a helper, not as the final editing tool.
No single tool wins every category, so it helps to know where a specialist might beat it.
| Alternative | Compare it with Pica AI for |
| Remaker AI | Face swap and broader AI image tools |
| Reface | Video and GIF face swaps |
| FaceApp | Selfie transformations and filters |
| Cutout Pro | Background removal and image cleanup |
| Fotor | General AI photo editing and design |
| Picsart | Social media design and creative edits |
| DeepSwap | Higher quality face swap focus |
| YouCam Perfect | Mobile selfie retouching |
Pica AI's real advantage is convenience, since it keeps Enhance, Headshot, and Face Swap close together under one account. But if one of those jobs matters far more than the others, a focused tool may give you a better result.
After focusing on Enhance, Headshot+, and Face Swap, I would describe Pica AI as a practical tool for quick photo improvements rather than a serious editing replacement. The enhancer is genuinely useful for cleaning up slightly weak photos. The headshot tool can produce profile ready images when the input selfie is clear and the output is checked carefully. The face swap tool is fun and surprisingly handy for casual creative edits, as long as it is used responsibly and with consent.
I would recommend Pica AI to casual users, creators, students, and anyone who wants quick visual experiments. I would not lean on it as the main tool for professional retouching, ecommerce product photos, official ID style images, or sensitive face edits.
The best way to use Pica AI is to generate, zoom in, compare, and then decide. Do not trust the first output simply because it looks polished.

I started testing Knowbase AI because my notes, PDFs, saved YouTube re...

OpenAI, the company behind ChatGPT and a driving force in generative a...

A stranger sends a friendly message on a dating app. The profile looks...

The first time I opened Remaker AI, I expected one button and one job....
As Apple’s Siri AI and other voice‑powered assistants undergo major ov...
The Blank Canvas Problem Dreamina AI Is Trying to SolveMost visual too...
Discussion