
You may apply an effect in Luminar Neo and instantly realize it looks good only in one part of the photo. The sky needs more drama, the subject needs more light, or the background needs less sharpness. That is where the Brush Mask becomes useful. Instead of applying an edit to the full image, you can paint the effect exactly where you want it.
A dramatic contrast boost can look great on a moody sky and terrible on a person's face. A sharpening pass can bring a subject into focus while making skin texture look harsh. A glow can flatter a portrait in one area and wash out detail somewhere else. The Brush Mask exists to solve that single problem: it confines an adjustment to the parts of the image you actually want to change.
This guide covers where the Brush Mask lives in Luminar Neo, what each control does, a step-by-step selective edit, real examples across portrait, landscape, product, and wedding work, how it compares to the AI selection tool, the mistakes that make brushed edits look fake, and the settings you should verify in your own version before relying on them.
| Quick Answer: The Luminar Brush usually refers to the Brush Mask in Luminar Neo. It lets users paint an edit into or out of selected parts of a photo. After applying a tool or adjustment, open the Masking tab and choose Brush mode. Then use Paint or Erase to control where the effect appears. It is useful for selective edits, portraits, skies, backgrounds, and layer blending. |
Brush Mask is one of the masking options in Luminar Neo. In plain terms, it lets you paint by hand to decide where an edit shows up. You apply a tool or adjustment as usual, then use the mask to keep that change on the subject, the sky, the background, the clothes, or any region you choose, and to keep it off everything else.
Depending on your workflow, the same brush logic applies inside individual tools and inside layer masks, so you can confine a single adjustment or a whole stacked effect. You can add to a mask by painting and subtract from it by erasing, which makes it easy to build up a selection and then clean the parts that spilled over. The Brush Mask is the tool to reach for when an automatic selection is not precise enough, because it gives you far more manual control than a global, whole-image edit.
The table below summarizes the feature at a glance. Items marked for verification can shift between Luminar Neo versions, so confirm them against the current interface and Skylum's documentation before you publish anything that depends on them.
| Item | Details |
| Feature Name | Brush Mask / Luminar Brush |
| Software | Luminar Neo |
| Main Use | Manually paint edits into or out of selected areas |
| Best For | Selective photo adjustments |
| Works With | Tools, effects, and layer masks, verify by version |
| Main Controls | Brush size, softness, strength or opacity, paint or erase, verify from current UI |
| Beginner Difficulty | Easy to medium |
| Biggest Benefit | Precise local editing |
| Biggest Limitation | Manual brushing can take time |
| Official Source | Skylum Luminar Neo knowledge hub |
A reliable path to the Brush Mask in current versions looks like this:
1. Open an image in Luminar Neo.
2. Go to the Edit tab.
3. Select a tool or adjustment.
4. Apply the effect so there is something to mask.
5. Open the Masking tab inside that tool.
6. Choose Brush mode.
7. Paint or erase the mask directly on the photo.
The exact interface can change slightly depending on your Luminar Neo version, so treat the labels above as a guide rather than a fixed map.
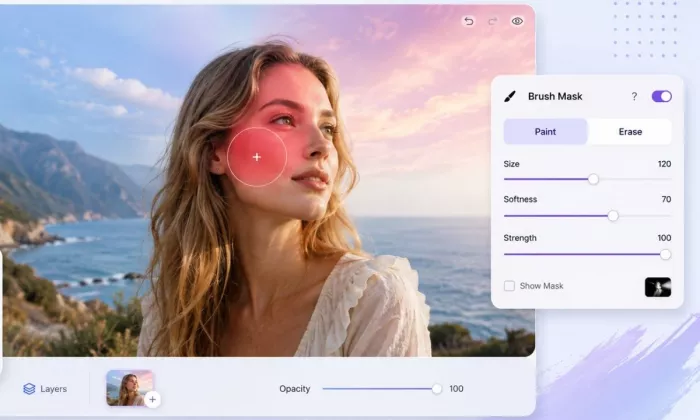
Once Brush mode is active, the masking controls appear, as the next screenshot shows.
The brush controls are simple once you know what each one changes. Confirm the exact set in your version, since labels and extras can differ, but the core controls below behave the same way across most releases. The settings panel in the screenshot further down shows where these sit in the interface.
| Brush Setting | Practical Meaning | Best Use |
| Size | Controls brush diameter | Large areas or small edges |
| Softness | Controls edge blending | Natural transitions |
| Strength or Opacity | Controls effect intensity while brushing | Subtle edits |
| Paint | Adds effect to area | Apply edit locally |
| Erase | Removes effect from area | Clean edges or undo overpaint |
| Mask Overlay | Shows where the mask is applied | Checking accuracy |
| Clear Mask | Removes the mask | Start again |
| Invert Mask | Reverses selected and unselected areas | Fast correction |
On keyboard shortcuts: Luminar Neo may offer shortcuts for actions such as changing brush size, but specific keys should be confirmed in Skylum's current documentation rather than assumed, since they can change between versions. If a shortcut is not clearly disclosed in Luminar Neo's official documentation at the time of review, treat it as unconfirmed.
Goal: Brighten only the subject's face without changing the background.
Work through the steps below in order. The aim is a small, believable change that stays on the face and leaves the background untouched.
1. Open the portrait in Luminar Neo.
2. Go to Edit.
3. Choose an adjustment or tool that brightens the image.
4. Increase exposure or brightness slightly.
5. Open the Masking tab.
6. Select Brush.
7. Use Paint mode to brush the effect onto the face.
8. Reduce strength near edges.
9. Use Erase mode if the effect spills onto hair or background.
10. Toggle mask visibility to check the selection.
11. Adjust the final tool strength.
12. Export or continue editing.
The compact version of the same workflow, with a tip for each stage:
| Step | Action | Tip |
| 1 | Open photo | Use a clear image for first practice |
| 2 | Apply adjustment | Make the effect slightly stronger first |
| 3 | Open Masking tab | Choose Brush mode |
| 4 | Paint effect | Use a soft brush |
| 5 | Clean edges | Use Erase mode |
| 6 | Refine strength | Avoid over-editing |
| 7 | Check before and after | Compare the full image |
| 8 | Save or export | Keep the original version if possible |
The screenshot below should capture this selective face edit in progress, with the mask overlay turned on so the painted area is easy to see.
The Brush Mask earns its place differently in each genre. The examples below show where painting a selection tends to help most, and the table that follows pairs each photo type with the mistake to watch for.
• Brighten the face without lifting the whole frame.
• Sharpen the eyes while leaving skin soft.
• Reduce a distracting background by darkening or softening it.
• Add a gentle glow only where it flatters.
• Keep harsh clarity and texture off the skin.
• Add drama to the sky without touching the land.
• Lighten a dark foreground.
• Reduce haze on distant mountains.
• Darken bright edges that pull the eye away.
• Bring detail back into rocks or trees.
• Brighten the front face of the product.
• Pull attention away from a busy background.
• Add selective sharpness to key edges.
• Lift shadows that hide detail.
• Keep the product shape and color looking natural.
• Brighten the couple so they stand out from the scene.
• Control blown highlights in the background.
• Add warmth selectively rather than across the whole image.
• Avoid pushing skin tones too far while editing.
The summary table below maps each genre to a typical Brush Mask use and the error that most often spoils the result.
| Photo Type | Brush Mask Use | Mistake to Avoid |
| Portrait | Face brightening and eye detail | Over-sharpening skin |
| Landscape | Sky and foreground control | Hard mask edges |
| Product | Selective brightness or sharpness | Changing product color unnaturally |
| Wedding | Subject emphasis | Too much glow on faces |
| Travel | Local contrast and light | Over-dramatic edits |
These two tools solve the same problem from opposite directions. MaskAI selects areas automatically, while the Brush Mask hands you the control and the responsibility. Knowing when to reach for each one saves a lot of time.
Skylum has described MaskAI as able to detect elements such as people, sky, buildings, vehicles, water, plants, mountains, and ground. Confirm the current list in official documentation before relying on it, since the detectable categories can change between versions.
| Selection Type | Manual painting | AI-assisted selection |
| Best For | Precise local corrections | Fast object or scene selection |
| Beginner Ease | Easy but manual | Easier for large objects |
| Edge Control | Strong with careful brushing | Depends on AI detection |
| Best Example | Clean spillover around face or hair | Select sky, people, buildings quickly |
| Limitation | Takes more time | May miss or misread areas |
| Best Workflow | Use for refinement | Use for starting the selection |
Most brushed edits that look wrong fail for a small number of repeatable reasons. The table below pairs each mistake with what it does to the image and a cleaner approach.
| Mistake | Result | Better Approach |
| Using a hard brush edge | Edit looks fake | Use a softer brush near transitions |
| Painting too much effect | Subject looks over-edited | Lower strength or reduce tool intensity |
| Ignoring the mask overlay | Missed areas or spillover | Toggle the overlay and check the mask |
| Brushing at the wrong zoom level | Messy edges | Zoom in for detail work |
| Applying the effect before planning | Confusing workflow | Decide the target area first |
| Not using Erase mode | Mask spills into the wrong area | Clean edges with Erase |
| Overusing clarity or sharpness on skin | Harsh portrait look | Brush only the eyes and details |
| Not checking before and after | Edit may be too strong | Compare regularly |
The Brush Mask is strong for most selective edits and weaker for high-volume work. The chart below summarizes how the use cases reviewed in this guide break down by suitability, and the table that follows gives the reasoning for each one.
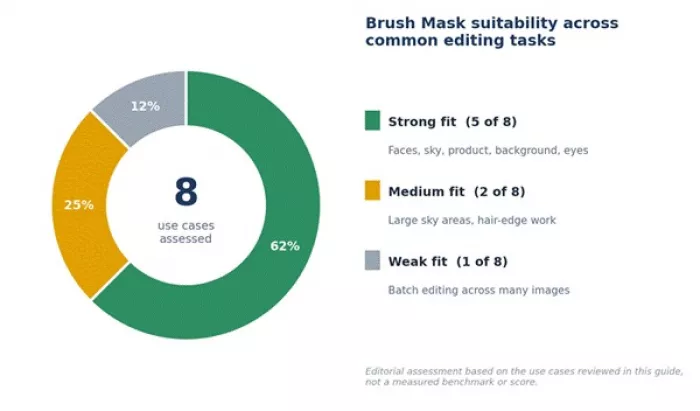
Distribution of the eight use cases assessed in this guide, by suitability. Editorial assessment, not a measured benchmark.
| Use Case | Brush Mask Fit | Reason |
| Brightening faces | Strong | Lets you edit only the subject |
| Sky drama control | Strong | Prevents the effect from touching buildings or people |
| Product highlight | Strong | Helps guide viewer attention |
| Background darkening | Strong | Useful for subject separation |
| Eye sharpening | Strong | Better than sharpening the whole face |
| Large sky selection | Medium | MaskAI may be faster first |
| Hair-edge editing | Medium | Needs careful brush work |
| Batch editing | Weak | Manual brushing takes time |
• Luminar Neo beginners learning local edits.
• Portrait photographers.
• Landscape photographers.
• Product photographers.
• Wedding photographers.
• Bloggers editing featured images.
• Users who want manual control after an AI mask.
• Editors who want selective effects without Photoshop complexity.
• Users expecting one-click perfect selection.
• Editors working on hundreds of images quickly.
• Users uncomfortable with manual brush work.
• Users needing advanced, Photoshop-level masking.
• Users on a mouse-only workflow with no patience for edge cleanup.
• Users editing very detailed hair, fur, or transparent objects.
If the Brush Mask is not the right fit for a given task, these related tools and workflows cover the same ground in different ways.
| Tool or Feature | Best For | Difference From Luminar Brush |
| Luminar MaskAI | Fast AI object selection | Less manual but may need refinement |
| Luminar Linear Gradient Mask | Sky or ground transitions | Better for straight, gradual edits |
| Luminar Radial Gradient Mask | Spotlight or circular edits | Faster for center-focused edits |
| Photoshop Brush Mask | Advanced professional masking | More powerful but more complex |
| Lightroom Masking Brush | Local photo adjustments | Strong raw workflow integration |
| Capture One Layers and Brush | Professional selective editing | More advanced color workflow |
In practice, many editors keep the Brush Mask and MaskAI side by side, use the gradient masks for skies and vignettes, and only move to Photoshop or Capture One when a job needs masking that Luminar Neo cannot reach.
Lumina's Brush Mask is not the fastest tool for every edit, but it gives users control that global adjustments cannot. If an effect looks good only on the subject, sky, background, or product, the Brush Mask helps apply it exactly where it belongs. The best results usually come from subtle brushing, soft edges, and regular before-and-after checks.
For beginners, the path is simple: start with one clear adjustment, keep the brush soft and the strength low, turn on the mask overlay so you can see what you are painting, and compare the full image before and after. Pair it with MaskAI when an automatic selection gets you most of the way, and verify any version-specific control or price against Skylum's current documentation before you depend on it.
| Bottom line: Reach for the Brush Mask whenever an edit belongs on part of the photo and not the whole frame. Soft edges and small strengths do most of the work. |

Most people reach Chub AI after a specific frustration. A favorite cha...
SpaceX has signed a major compute agreement with Reflection AI, an ope...

A Creator’s Take on MagicLight AIMost AI video tools are useful when y...

FaceCheck ID can feel useful when a profile photo looks suspicious or...
For most of the conversation around artificial intelligence, the word...

Signal President Meredith Whittaker has a clear message for people for...
Discussion