

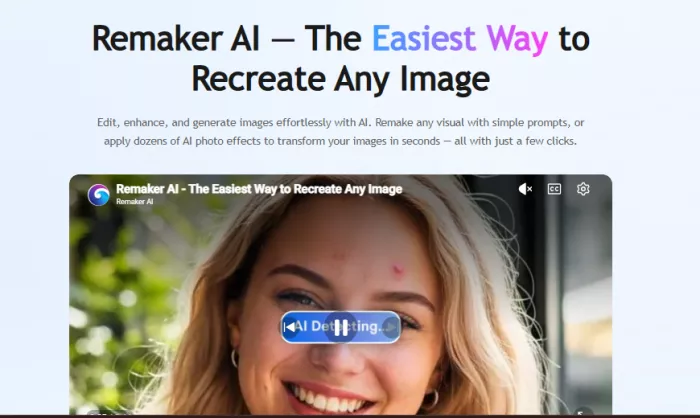
The first time I opened Remaker AI, I expected one button and one job. Instead I found a whole shelf of tools: face swap, an image generator, a background remover, an image enhancer, portrait and headshot makers, plus object and watermark cleanup. For a beginner, that menu is the first hurdle. You came to swap a face or clean up one photo, and now you are staring at ten options wondering which one you actually need.
This Remaker AI guide is the walkthrough I wish I had on that first day. It explains what each main tool does, how to use the big ones step by step, how to get cleaner results, and where a human still needs to look before anything goes public. Nothing here is hype. Some tools are genuinely handy, a few need babysitting, and a couple of jobs are still better finished in a normal editor. By the end you should know which feature to open first and how to avoid the rough output that makes AI edits obvious.
To write this, I treated Remaker AI the way a first-time user would, not the way a polished demo does. I fed it the kind of images beginners actually have: phone selfies, slightly soft product shots, side-angle portraits, and a few clean studio-style photos for comparison. For each tool I ran the easy case and the messy case, then checked the output for the flaws beginners tend to miss, such as melted hairlines, mismatched skin tone, smeared edges around hair, distorted hands, and text that turns to gibberish.
I am calling that lens the source-to-output check, because in almost every test the quality of the result tracked the quality of the input far more than any setting did. That single pattern shapes most of the advice below.
One standing note on accuracy: features, credits, export quality, watermark rules, upload limits, commercial rights, and privacy terms change often on tools like this, and none of them are invented anywhere in this guide. Verify the current details on the official Remaker AI website before you rely on them for client or business work. The focus here is on using the tools well, not on quoting numbers that may already be out of date.
If you only read one section, read this one.
• Best for quick AI photo edits and creative image changes when you do not want to open heavy software. • Covers face swaps, portraits, background removal, image enhancement, and AI-generated visuals in one place. • Beginner-friendly to start, but the quality of your source image decides most of the result. • Output depends on lighting, face angle, image resolution, and how clearly you write your prompt. • Credits, watermarks, and rights can vary by plan, so check the official site before any business use. |
Here is the same idea as a quick reference before we go deeper.
| Feature | Purpose | Best For | Beginner Tip |
| Face swap | Replaces one face with another in a photo | Fun edits, concept shots, costume swaps | Use clear, front-facing faces for both |
| Multiple face swap | Swaps several faces in one group image | Family, team, or event photos | Make sure each face is sharp and separated |
| AI image generator | Creates new images from a text prompt | Blog covers, social visuals, concept art | Be specific; vague prompts look generic |
| Background remover | Cuts the subject out from its background | Product shots, profile photos, thumbnails | High subject-background contrast helps |
| Image enhancer | Sharpens and enlarges low-quality images | Old, small, or slightly blurry photos | Start from the best original, not a screenshot |
| Portrait and headshot | Turns a selfie into a styled portrait | Profile pictures, personal branding | Use a well-lit, neutral selfie |
| Object and uncrop tools | Removes objects or extends the frame | Cleaning distractions, fixing tight crops | Zoom in and check the patched area |
| Download and export | Saves the finished image to your device | Final files for web, print, or social | Review at full size, not just the preview |
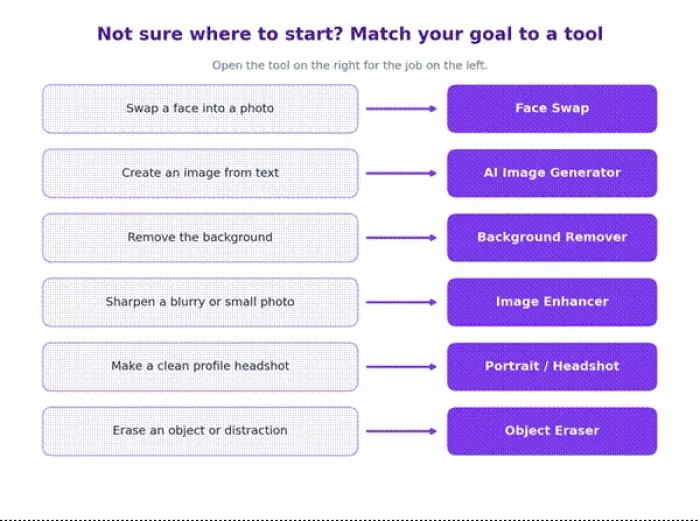
A quick way to choose your first Remaker AI tool by what you want to do.
Getting in is the easy part. Open the official Remaker AI website at remaker.ai in a normal browser. Most tools let you try a quick edit, though some features ask you to sign up or log in before you can download. Create an account if prompted, usually with an email address or a Google login.
Before you upload anything, take a minute to get oriented:
• Check your free credits or usage limits so you know how many generations you have.
• Open the tools menu and read the labels, since the main tools are grouped by job: swap, generate, enhance, and remove.
• Note the upload requirements and file size limits for the tool you plan to use.
• Find where finished images download, and whether a watermark appears on free output.
The part beginners skip, and later regret, is the fine print. Before you use any output for business, client, or paid work, check the current pricing, credit usage, watermark rules, privacy terms, and commercial usage rights on the official site. These differ by plan and change over time, so do not assume the free tier includes commercial rights or watermark-free downloads. I am deliberately not quoting prices or credit counts here, because the live numbers are the only ones worth trusting.
Each tool has a job it does well and a job it struggles with. In plain terms, here is what the main ones are for:
• Face swap puts a chosen face into a target photo or template.
• AI image generator builds brand-new images from a text description.
• Background remover isolates your subject by stripping the background.
• Image enhancer sharpens and upscales soft or low-resolution photos.
• Portrait and headshot tools turn an ordinary selfie into a styled, cleaner portrait.
• Object and uncrop tools remove unwanted objects or extend a tight frame.
• Multiple and batch workflows handle several faces or images in one pass where the plan supports it.
The table below adds the practical details: the best input for each tool, where it works, the mistake to avoid, and what to check before you download.
| Tool | Best Input | Best Use Case | Common Mistake | Review Before Downloading |
| Face swap | Clear, front-facing photos of both faces | Creative or costume edits, concept shots | A blurry or side-angle source face | Skin tone match, hairline, and eyes |
| AI image generator | A specific, detailed text prompt | Original covers, social graphics, concept art | A short, vague one-line prompt | Warped hands, odd text, generic feel |
| Background remover | High-contrast subject on a plain backdrop | Product cutouts, profile photos, thumbnails | Expecting clean edges on busy, hairy shots | Hair and clothing edges for stray pixels |
| Image enhancer | The best-quality original you have | Small, old, or softly blurred photos | Trying to rescue a heavily damaged image | Faces and fine text for over-smoothing |
| Portrait and headshot | A well-lit, neutral, front-facing selfie | Profile pictures and personal branding | Feeding a low-light group photo | That the face still looks like you |
| Object and uncrop | A clean image with a separable object | Removing distractions, extending a crop | Erasing huge objects and expecting magic | The patched or extended area, up close |
| Multiple and batch | Sharp images with separated faces | Group photos and repeat edits | Assuming every face swaps equally well | Each face on its own, not the whole frame |
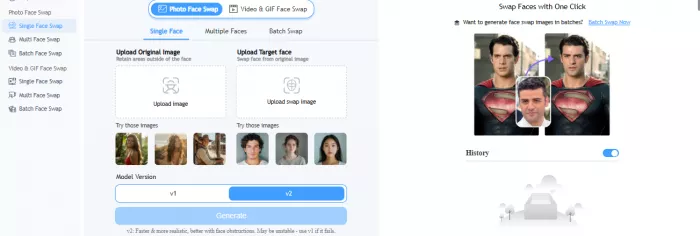
Face swap is the tool most people open first, so it is worth doing right. Here is the full sequence.
1. Open the face swap tool from the tools menu.
2. Upload the source image, the photo that has the face you want to use.
3. Upload the target image or template, the photo or scene you want that face placed into.
4. Use clear, front-facing images for both whenever you can.
5. Avoid extreme head angles, poor lighting, sunglasses, hats that hide the hairline, and heavy blur.
6. Run the swap and wait for it to process.
7. Check the result closely: skin tone, the edges of the face, the eyes, the hairline, and whether the lighting direction agrees with the rest of the photo.
8. If something looks off, swap in a better source image or regenerate rather than trying to patch a bad result later.
9. Download only after the face genuinely blends at full size, not just in the small preview.
| A note on safe and fair use. Face swap is the one tool here that can cause real harm if it is misused, so treat it with care. Use it only on your own images or images you have clear permission to edit. Do not use it to impersonate people, create misleading or non-consensual edits, harass anyone, run scams or fake endorsements, push political deception, or damage someone's reputation. When you edit a real person, get their consent and be transparent that the image was altered. Never create face-swapped content involving minors. The technology is fine; using it to deceive or hurt people is not. |

The same nine steps grouped into setup, optimize, and review.
Almost every weak face swap I produced came from a weak source image, not a weak tool. Upgrade the input and the output usually fixes itself. Here is what to swap out.
| Weak Input | Better Input | Reason It Improves Output |
| Blurry face image | A sharp, in-focus photo | The tool maps features it can see, so detail in equals detail out |
| Side-angle portrait | A straight, front-facing shot | Frontal faces give clean reference points for eyes, nose, and mouth |
| Face behind glasses or a mask | An unobstructed face | Hidden features get guessed, which is where distortion creeps in |
| Low-light selfie | A well-lit photo with even light | Good light helps match skin tone and avoids muddy results |
| Group photo with unclear faces | A solo photo of the person | One clear face removes the guesswork of picking the right one |
| Low-resolution image | A higher-resolution version | More pixels give the model more to work with, so edges look natural |
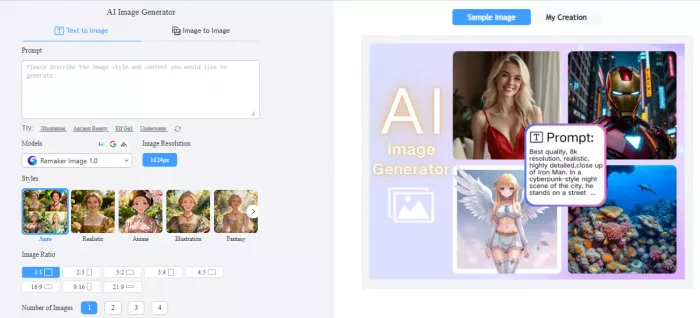
The generator builds images from a description, which is great for original covers and social visuals when you do not want stock photos. The trick is the prompt. Open the generator, then work through this:
• Write a clear prompt that describes the subject, the setting, and the look you want.
• Choose any available style, aspect ratio, or quality setting to match where the image will be used.
• Add negative instructions if the tool supports them, telling it what to leave out.
• Generate, then review the details before you download.
• If the output looks generic, off-topic, or distorted, refine the prompt and regenerate rather than settling.
A prompt that works tends to follow the same shape:
| Subject + Scene + Style + Lighting + Composition + Mood + Quality Details + Negative Instructions |
You do not need every part every time, but the more of these you include, the less generic the result. The eight blocks below show how the formula maps to a real prompt.
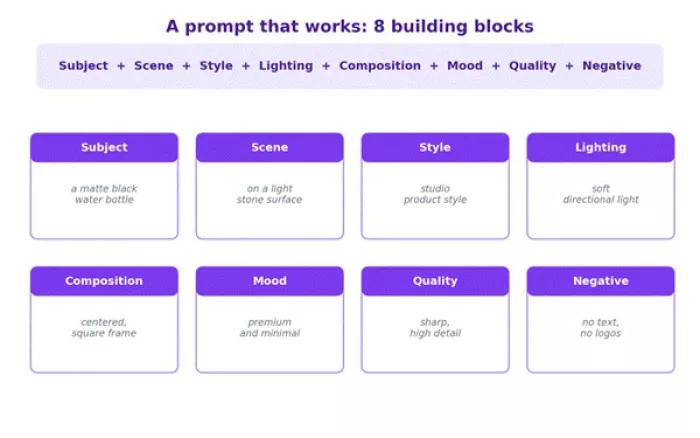
One prompt, broken into the eight parts that make it specific.
Here are eight ready prompts you can adapt. Treat them as starting points, then tune the wording to your subject.
| Use Case | Prompt Example | Best Setting Direction | Editing Tip |
| Blog cover image | A tidy home office desk with a laptop and notebook, soft morning window light, clean minimal style, wide composition with empty space on the left, calm focused mood, sharp and detailed, no text, no logos | Wide or 16:9, high quality | Leave the left third clear for your headline |
| Social media visual | A bright flat-lay of coffee, sunglasses, and a phone on a pastel background, playful modern style, soft even light, square composition, cheerful summer mood, crisp and clean, no watermark | Square 1:1, vibrant | Add your caption and a brand color band after download |
| Product concept | A matte black water bottle on a light stone surface, studio product style, soft directional light with a gentle shadow, centered composition, premium minimal mood, high detail, plain neutral background | Square or 4:5, high quality | Drop it onto a real product photo if you need accuracy |
| Profile background | A softly blurred modern office in cool neutral tones, clean corporate style, even diffused light, simple horizontal composition, professional approachable mood, smooth and uncluttered, no people, no text | Wide aspect ratio | Keep it subtle so your portrait stays the focus on top |
| AI fashion concept | A model in a tailored beige trench coat on a quiet city street, editorial fashion style, soft overcast light, full-body vertical composition, confident relaxed mood, detailed fabric texture, no brand logos | Portrait 3:4 or 9:16 | Check hands and seams, then refine if they look off |
| Tech article image | An abstract network of glowing connected nodes in blue and violet, clean futuristic style, soft ambient glow, balanced horizontal composition, calm intelligent mood, sharp and detailed, dark uncluttered background, no text | Wide 16:9, high quality | Avoid fake interface text; add real labels yourself |
| Lifestyle photo | Two friends laughing over brunch at an outdoor cafe, natural candid style, warm late-morning sunlight, relaxed horizontal composition, joyful easy mood, realistic skin and texture, no logos, no watermark | Horizontal, photoreal | Inspect faces and hands before using it as a hero image |
| Creative artwork | A small glowing lighthouse on a floating island above the clouds at dusk, painterly fantasy style, warm golden rim light, sweeping wide composition, dreamy peaceful mood, rich detail, no text | Wide, high detail | Generate a few variations and pick the cleanest one |
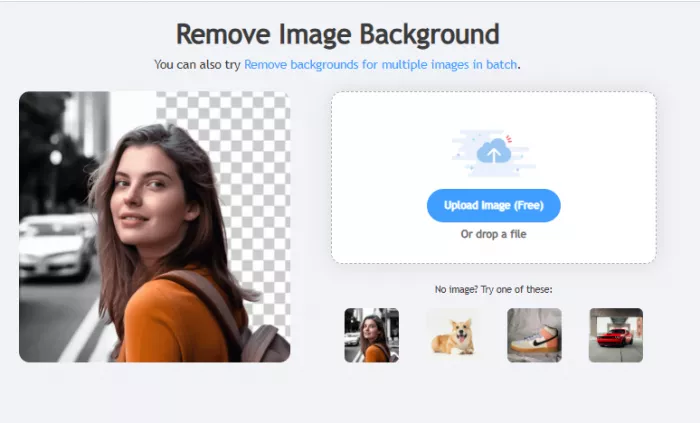
This one is genuinely fast for product shots, profile pictures, and thumbnails. Open the background remover, then:
• Upload a clear image where the subject stands out from the background.
• Run the removal and let it isolate the subject.
• Check the edges closely, especially around hair, fingers, and thin objects.
• Export with a transparent background, or a replacement color or scene if the tool offers one.
• Use the cutout in product listings, social posts, thumbnails, profile photos, or design tools.
A few habits make a real difference:
• Pick images with simple, plain backgrounds for the cleanest cutouts.
• Avoid busy or cluttered backgrounds when you can, since they confuse edge detection.
• Always zoom into hair and object edges before you trust the result.
• If edges look rough, finish the cutout or place a new background in Canva, Photoshop, Figma, or a similar tool.
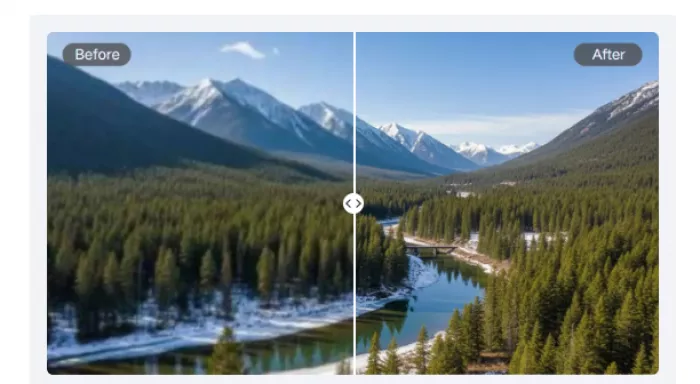
The enhancer is for images that are blurry, small, compressed, or just old and soft. Use it like this:
• Upload the best available original, not a screenshot or a re-saved copy.
• Keep expectations realistic; it can sharpen and enlarge, but it cannot rebuild detail that was never captured.
• After enhancing, check faces, any text, fine textures, and edges, since these are where AI sharpening can look artificial.
• Compare the before and after side by side before publishing, and keep the version that actually looks natural.
Severely damaged or heavily pixelated photos will only improve so far. If the result looks plastic or over-smoothed, the original was probably too far gone for a clean fix.
The right tool depends on what you make. Below is a practical map by user type. Whatever the workflow, it ends the same way: review the output at full size before you publish.
| User Type | Best Remaker AI Feature | Practical Workflow | Extra Tool to Use After |
| Social media creators | Background remover and generator | Clean or generate a visual, then add captions and brand colors | Canva |
| Bloggers and SEO teams | AI image generator | Create an original cover, then add the title text by hand | Canva or Photopea |
| YouTubers and thumbnails | Background remover and face swap | Cut out the subject, then build a bold thumbnail layout | Photoshop or Canva |
| eCommerce sellers | Background remover and enhancer | Remove the background, enhance the product, place it on a clean scene | Photoshop or Figma |
| Profile photo users | Portrait and background tools | Turn a good selfie into a clean headshot, then crop to size | Pixlr |
| Designers and marketers | Generator and object editing | Generate concept assets, then refine and composite properly | Photoshop or Figma |
| Meme and creative makers | Face swap and meme tools | Swap faces or build the visual, then add captions | CapCut or Canva |
| Small business owners | Background remover and enhancer | Produce clean product and profile images without a photographer | Canva |
| Students and casual users | Image enhancer and portrait tools | Sharpen photos or make a tidy profile picture for projects | Pixlr or Photopea |
Most rough results trace back to a short list of habits. Watch for these:
• Uploading blurry or low-resolution images and expecting sharp results.
• Expecting a perfect face swap from a side angle or a poorly lit source.
• Ignoring lighting mismatch, so the new face is lit differently from the scene.
• Using copyrighted or non-consensual images without thinking about permission.
• Publishing face swaps with no transparency that the image was edited.
• Treating the first output as final instead of checking details at full size.
• Using generated images commercially without confirming the usage rights.
• Skipping the pricing and credit limits, then getting surprised mid-project.
• Ignoring watermark and export rules on free output.
• Picking AI visuals that look nice but do not match the article, product, or brand.
No AI editor is magic, and being honest about the gaps saves you time. Keep these in mind:
• Face swaps can look unnatural when the source image is weak, with mismatched skin or a soft hairline.
• Hands, eyes, hairlines, and skin texture often need a second look and sometimes a manual fix.
• Background removal can struggle with fine hair, transparent objects, and busy edges.
• The enhancer cannot rescue every low-quality photo; some detail is simply gone.
• Generated images can look generic or stocky without a detailed, specific prompt.
• Free usage may come with credit limits, watermarks, or export restrictions.
• Commercial rights and privacy terms are not guaranteed and must be checked on the official site.
• Identity-based or sensitive edits demand extra caution and consent.
• Some results will still need finishing in another editor before they are publish-ready.
Remaker AI is a strong all-in-one for fast edits and face swaps, but it is not the only option and not always the best fit. Here is a short, honest comparison so you can match the tool to the job rather than forcing one app to do everything.
| Tool | Better For | Main Strength | Main Limitation Compared With Remaker AI |
| Canva AI tools | Finishing and publishing designs | Templates, text, and layout in one place | Less specialized for realistic face swaps |
| Fotor | All-round photo editing | Friendly editor with solid AI extras | Face swap feels more secondary |
| Pixlr | Browser-based manual editing | Layered editing like a lighter Photoshop | Generation and swap tools are lighter |
| Cutout.Pro | Background and cutout work | Fast, clean automatic cutouts | Narrower creative toolset overall |
| Adobe Firefly | Commercial-minded AI generation | Strong generation with clearer licensing | Less of a quick one-click face swap flow |
| FaceApp | Selfie and face transformations | Polished face filters on mobile | More about styling your own face than swapping faces in scenes |
A final pass before the image goes anywhere. The visual below sums up the core checks.
✓ Face and skin tone look natural and consistent.
✓ Edges around hair and clothes are clean, with no halo or stray pixels.
✓ No distorted eyes, mouth, hands, or object details.
✓ The background looks consistent with the lighting and scene.
✓ The image actually matches its intended use and message.
✓ No unwanted text, logo, or stray artifacts.
✓ Correct size and aspect ratio for the platform.
✓ Commercial usage rights checked if this is for business.
✓ Watermark and export rules understood.
✓ Privacy and consent reviewed.
✓ Final image checked at full size on both desktop and mobile.
The checks that catch most rough AI edits before they go public.
After putting Remaker AI through the easy jobs and the messy ones, here is where I land. For a beginner who wants face swaps, background removal, image enhancement, and AI-generated visuals from one place, it is genuinely useful and fast. You can get a usable result in minutes without learning heavy software, and for casual, social, and concept work that is often all you need.
The honest caveat is that the tool rewards good inputs and punishes lazy ones. Clean, well-lit, front-facing source images, specific prompts, and a careful look at the output do most of the heavy lifting. Treat the first result as a draft, check the details at full size, and be ready to finish the image in a normal editor when it matters.
So I would call Remaker AI a fast creative assistant, not a replacement for judgment. It will not handle consent for you, fact-check your claims, protect your brand, or make the final editing call. Keep those in your own hands, verify the current pricing, rights, and privacy terms on the official site before any serious use, and Remaker AI becomes a handy first stop in a smart workflow rather than the whole workflow. That, in short, is the most useful way to read this Remaker AI guide: try it, review everything it gives you, and let a human make the last decision.

Most investors building around AI stocks are chasing growth, and that...
Artificial intelligence is changing how we use video. It used to be a...

If you look at how digital content is made today, everything moves inc...

Let’s be entirely honest about the modern corporate environment: nobod...
AI video generators create ads from product photos by first understand...
Google is officially retiring Veo as the default video model inside th...
Discussion